Skip to content

2008

Growing your Xen guest disks with xen-resize-guest

This morning I woke to a notification from nagios telling me the disk was full on one of the slices I manage for a client. I knew what I had to do. As we run Xen virtual servers on dedicated hardware I could shut down the slice, increase the lvm size, grow the filesystem and then fire up the slice again. What I didn't look forward to was reading man pages and  googling to find out exactly how to do that.

I was glad to discover that Steve Kemp's xen-tools-3.9 (a collection of scripts for creating and managing xen virtual machines) contains a command that does just what I needed. This script is not included in Ubuntu 7.10's package (xen-tools-3.5) so I just copied the script from the source distribution.

Xen-tools is well thought out, simple to use and easy to extend. I've been using it since I started using Xen and highly recommend it.

xen-tools-resize allowed me to grow the main disk for my gateway slices from 2GB to 10GB in about a minute with just one command. That left me with time to  tell you about Steve's awesome  toolkit! Steve's also got some great sysadmin tips at http://www.debian-administration.org/

    root@sm01:~# xen-resize-guest --hostname=gw1 --add=8Gb
    Preparing to resize image: /dev/vm_local/gw1-disk
    Sleeping for 9 seconds to allow cancel
    Sleeping for 8 seconds to allow cancel
    Sleeping for 7 seconds to allow cancel
    Sleeping for 6 seconds to allow cancel
    Sleeping for 5 seconds to allow cancel
    Sleeping for 4 seconds to allow cancel
    Sleeping for 3 seconds to allow cancel
    Sleeping for 2 seconds to allow cancel
    Sleeping for 1 seconds to allow cancel
    Sleeping for 0 seconds to allow cancel
    DO NOT INTERRUPT
      Extending logical volume gw1-disk to 10.00 GB
      Logical volume gw1-disk successfully resized
    Checking filesystem
    e2fsck 1.40.2 (12-Jul-2007)
    Pass 1: Checking inodes, blocks, and sizes
    Pass 2: Checking directory structure
    Pass 3: Checking directory connectivity
    Pass 4: Checking reference counts
    Pass 5: Checking group summary information
    /dev/vm_local/gw1-disk: 22115/262144 files (1.7% non-contiguous), 264768/524288 blocks
    Resizing in place
    resize2fs 1.40.2 (12-Jul-2007)
    Resizing the filesystem on /dev/vm_local/gw1-disk to 2621440 (4k) blocks.
    The filesystem on /dev/vm_local/gw1-disk is now 2621440 blocks long.

    All done
cherry picking git commits

I've been a little bit slow to learn git. I put that down to it being my fourth version control system (after rcs, cvs and svn). Like a fourth child[1] it brought with it less novelty and I've got less free time to get to know it. That being said, git is a revolutionary advance over subversion and is worth committing the effort to learn.

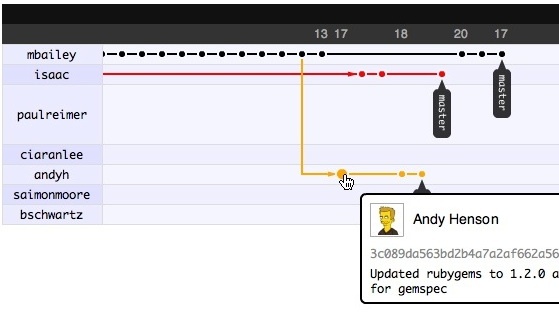
A little while ago I imported my deployment library 'deprec' to github. This week I discovered a feature that shows me what changes other open source developers have been making on their forks of the deprec codebase.

Github network feature

Clicking on that link shows us a diff for that commit and today Pete Yandell was kind enough to show me how to cherry pick a commit and apply it to my repository.

#First we create a branch and pull thewoolleyman's code into it
git checkout -b thewoolleyman
git remote add thewoolleyman git://github.com/thewoolleyman/deprec.git
git pull thewoolleyman master

# Next we find a commit that interests us
# I chose 09dca130c2826339f3cacff937acee4ef26c6d6c
git log

# Compare this changeset with the previous version
# Note that you can use github for this and the previous step.
diff 09dca130c2826339f3cacff937acee4ef26c6d6c 09dca130c2826339f3cacff937acee4ef26c6d6c^

# Change back to our master branch
git checkout master
git cherry-pick 09dca130c2826339f3cacff937acee4ef26c6d6c

# Push the changes to our remote repo (in this case - github)
git push

I'm pretty excited at how simple it is to see what other people have done with my code and merge it into deprec. Github have provided a feature that I think will really aid in the development of open source. Well done guys!

[1] I don't have kids (yet) but if and when I do I hope they realize this was said in jest!

How to use deprec-1 when deprec-2 gem is released

[2013-12-19 I've not done any work on deprec in the past few years]

deprec-2 preview has been available at www.deprec.org for a while now and is quite stable. When I release it as a new version of the deprec gem it's going to cause users of deprec-1 to see errors. I recommend using deprec-2 for new installations but understand that some people will want to continue using deprec-1 for legacy systems. In preparation for release of deprec-2.0.0 I've some minor modifications so that deprec1 and deprec2 co-exist on the same machine.

To continue using deprec-1.x, install deprec-1.9.3:

$ sudo gem install --version 1.9.3 deprec

Update your projects deploy.rb:

require 'rubygems'
gem 'deprec', '< 1.99'
require 'deprec'

Adding the following to your .caprc will load the correct version of deprec based on the version of Capistrano you're using:

require 'rubygems'
gem 'deprec', '< 1.99' unless respond_to?(:namespace)
gem 'deprec', '>= 2.0.0' if respond_to?(:namespace)
require 'deprec'

You can call capistrano 1 with the command:

cap _1.4.2_ show_tasks

or create an alias by putting the following in your .profile:

alias cap1="`which cap` _1.4.2_"

This will allow you to use the following:

cap1 show_tasks

If everything's working you'll see the deprec tasks listed.

Getting monit to restart mongrel after a crash

An annoying aspect of the Mongrel webserver is that it refuses to start if it detects a stale pidfile. This causes real problems when you're trying to use something like Monit to automatically restart mongrel after a crash.

Most daemons check whether the process_id in the pidfile is running. Ezra has indicated that a future release of mongrel will do this but in the meantime, we can use mongrel_cluster with the --clean option to remove stale pidfiles before starting mongrel.

Update /etc/init.d/mongrel_cluster to include the --clean option in the start and restart commands.

  start)
    # Create pid directory
    mkdir -p $PID_DIR
    # chown $USER:$USER $PID_DIR

    mongrel_cluster_ctl start --clean -c $CONF_DIR
    RETVAL=$?
;;
  stop)
    mongrel_cluster_ctl stop -c $CONF_DIR
    RETVAL=$?
;;
  restart)
    mongrel_cluster_ctl restart --clean -c $CONF_DIR
    RETVAL=$?

Update your monit config to use mongrel_cluster. Note that monit sets a restricted path (PATH=/bin:/usr/bin:/sbin:/usr/sbin) and the internals of the mongrel_cluster gem call mongrel_rails without specifying the path. mongrel maintainers [http://mongrel.rubyforge.org/ticket/31#comment:1 suggest] using env in the monit command and said this is already fixed in a svn. I've found creating a symlink from /usr/local/bin/mongrel_rails to /usr/bin/mongrel_rails does the trick. Then update your monit config to look something like this:

check process mongrel-8010 with pidfile /var/www/apps/tubemarks/shared/pids/mongrel.8010.pid
group mongrel
start program = "/usr/local/bin/ruby /usr/local/bin/mongrel_rails cluster::start --only 8010 -C /etc/mongrel_cluster/tubemarks.yml"
start program = "/usr/local/bin/ruby /usr/local/bin/mongrel_rails cluster::stop --only 8010 -C /etc/mongrel_cluster/tubemarks.yml"

The nice part here is the --only option which allows you to restrict the command to a single mongrel process (as defined in the config file).

I've deprec-1.99.16 has been updated to use mongrel_cluster as described above to clean up stale pidfiles before starting mongrel. As a side note, I was glad to see mongrel has a new website and is being fed and cared for by it's new owners.