Right-sizing your AWS Lambdas
I was recently able to reduce the cost of one of our serverless applications by more than half by reducing the memory allocated to the lambdas.
Possible reasons we didn't do this earlier: - initial cost was low but increased later as traffic increased - team didn't have knowledge/confidence to set lower threshold - we weren't monitoring/alerting on memory usage
AWS Lambda Pricing
AWS Lambda lets you run code without provisioning or managing servers. You pay only for the compute time you consume - there is no charge when your code is not running. - https://aws.amazon.com/lambda/
Lambda is charged based on number and duration of requests (AWS Pricing). Duration is measured in GB-seconds which is why it's possible to reduce your cost by reducing the maximum memory provided to you lambdas.
You specify an amount between 128 MB and 3,008 MB in 64 MB increments. Lambda allocates CPU power linearly in proportion to the amount of memory configured. At 1,792 MB, a function has the equivalent of 1 full vCPU (one vCPU-second of credits per second).
There are situations where provisioning far more memory than will be used is a good choice. If the function is CPU bound (as opposed to waiting on responses from the network) then increasing CPU will reduce duration, improving performance without negatively impacting on cost.
The risk when setting memory for a Lambda is that execution halts immediately if the function runs out of memory. Changes to the function over time may alter it's memory usage so we're best to monitor and alert on this.
Checking Memory Usage
It's relatively simple to report on the maximum memory being used by a lambda. This can help you select an appropriate amount.
Lambda logs maxMemoryUsed for each function invocation to CloudWatch Logs. CloudWatch Logs Insights includes a sample query that reports on overprovisioned memory.
The example below is for a function that spends most of it's time waiting on responses from web apis. The report shows it had 976 MB memory and used at most 275 MB in the past three days. Note that the sample query returns figures that may be confusing due to them using a different unit (MiB) than is used for configuring Lambda functions (MB). (I've requested this be fixed).
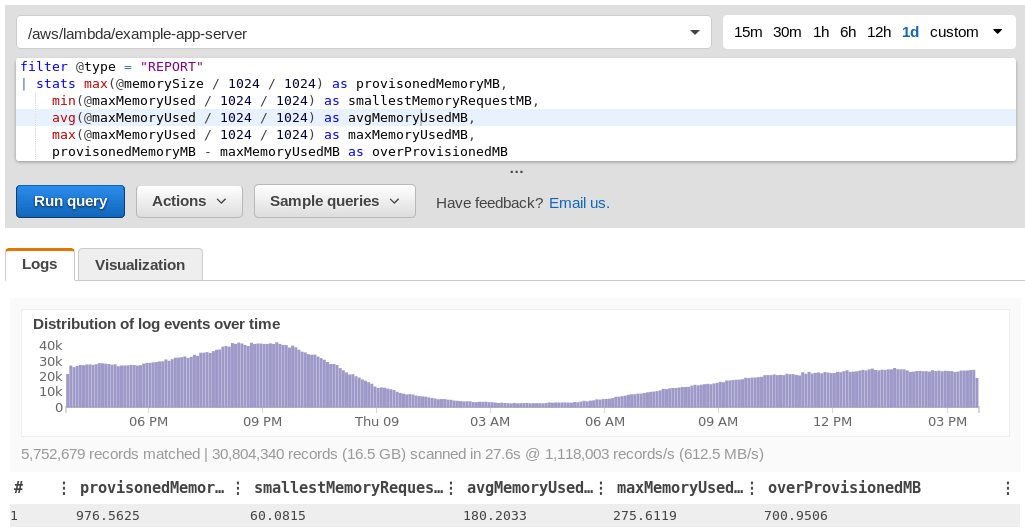 CloudWatch Logs Insights query displaying overprovisioned memory in Lambda
Choose good memory limit for your function
We initially decided to set the memory to 384 MB and setup an alarm to alert us if a function uses 80% of that (307 MB). On checking CloudWatch later we saw function duration increased after the memory was decreased. This was due to the CPU decrease that happens when you reduce memory for the lambda. We decided to manually increase and decrease memory until we found a sweet spot of 512 MB. This was still a 50% decrease in cost with minimal impact on duration.
Monitor and alert in case things change
If our lambda memory usage increases over time, we want to be notified. Below are snippets from the CloudFormation template for our application that write memory used to a custom CloudWatch Metric and alert us if it gets to 80% of the maximum we have set.
CloudWatch Logs Metric Filter
A Metrics Filter parses all logs from the function and writes the max_memory_used value to a custom metric. This provides a convenient way to graph and alert on that metric.
AppMetricFilter:
  Type: AWS::Logs::MetricFilter
  Properties:
    LogGroupName:
      Ref: AppDashserverLogGroup
    FilterPattern: '[ report_label="REPORT", ..., label="Used:", max_memory_used_value, unit="MB" ]'
    MetricTransformations:
      - MetricValue: '$max_memory_used_value'
        MetricNamespace: LogMetrics/Lambda
        MetricName: example-app-memoryUsed'
I'd not come across Metrics Filters before but am glad I have. From whatI can gather, a custom metric costs you $0.30/month but there is no additional charge to have your CloudWatch logs filtered through a Metrics Filter to feed it.
CloudWatch Alarm
We created a CloudWatch alarm to notify us if the maximum memory used bya function exceeded 80% of what it was provisioned with.
AppAlarmLambdaMemory:
  Type: AWS::CloudWatch::Alarm
  Properties:
    AlarmActions:
      - Ref: AwsAlertsAlarm
    AlarmDescription: Lambda memory usage above 80% for example-app-memoryUsed
    ComparisonOperator: GreaterThanThreshold
    EvaluationPeriods: 1
    MetricName: 'example-app-memoryUsed'
    Namespace: LogMetrics/Lambda
    Period: 60
    Statistic: Maximum
    Threshold: 307 # 80% of provisioned memory
    Unit: Megabytes
Checking your lambda's cost
I recommend using AWS Cost Explorer to view at your lambda costs. I generally access it via the AWS Console although I was excited to discover you can also query it via AWSCLI).
Some hints to help you breakdown costs by Lambda:
- Filters -> Include Only -> Lambda
- Group By -> Tag: aws:cloudformation:stack-name
Reduced waste and early warning against failure
This work will save us around $600/month running this application. It also provides us with more visibility into memory usage and alerts for when it increases.
It's often a tough call to decide whether ROI on cost savings will justify the effort. You don't know till try it. If you've blown your budget that can be a motivation. Hopefully the information here can help others in their efforts to reduce waste.